

How To Install Faster Processor
Dwelling house > PC Assembly > Install CPU
How to Install a CPU on the Motherboard
4-Pace Beginner'southward Guide to Safely Fitting an Intel or AMD Processor (& Photos)

Concluding Updated: April 21, 2022
Learning how to install a CPU onto the motherboard is straightforward, but there are couple tips to know before and during CPU installation to ensure a properly-installed and secure processor, and to avert dissentious something. CPUs are frail so you're going to want to have your time with this part to make sure yous do things correctly.
These steps on how to install a processor are function of our main how to assemble a PC tutorial. Refer to that guide if you demand to acquire the steps before and afterward installing your CPU (such as getting the motherboard ready).
This CPU install walkthrough explains and shows both how to install an Intel CPU, and how to install an AMD CPU (specifically, using the Intel LGA1151 socket and AMD AM4 socket). The steps are very similar for installing Intel and AMD CPUs, but there are a couple minor differences which we'll become to.
CPU Safety Reminder
Before proceeding with the CPU installation steps below, merely proceed in mind the following safety precautions:
- Always handle the CPU with bully care.
- Hold a CPU only by its edges/sides (don't impact the bottom or top).
- Keep your CPU in the anti-static safe bag that information technology came with until the moment you're ready to install it. Don't exit it lying around in the open.
Lastly, earlier we become directly into the CPU install steps, you'll find the photos used in this CPU install guide show how to install a CPU onto the motherboard outside the instance. Simply don't worry if you're installing a CPU within the instance (when your motherboard is already inside), as it's the aforementioned process.
See Also: How to Choose a CPU (Features Explained)
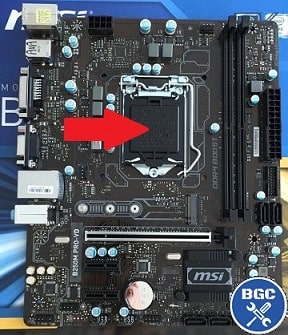
Step 1: Locate the CPU Socket
Yup, we weren't kidding when nosotros said the chief aim of our guides and tutorials is to ensure admittedly no noob ever gets left behind. We keep things every bit simple as is possible.
So, get-go go ahead and find the CPU socket on your motherboard. Yous can't miss it - look for the large square socket somewhere near the middle of your motherboard that has a little metal lever alongside it.
This is where your trusty new CPU will happily reside for the next few years (well, hopefully). Intel and AMD sockets look slightly different, as you lot'll see below, but they're in the same location.
Footstep 2: Open the CPU Socket
To open up the CPU socket on the motherboard, y'all need to first lift up the retentiveness arm (the small metal lever on the side of the socket). Unlock the retention arm by pulling information technology out to the right (away from the socket) so that it'southward complimentary to then exist lifted up. Lift the arm up all the way, then open up the socket cover. Only Intel CPU sockets have covers - AMD sockets exercise not.
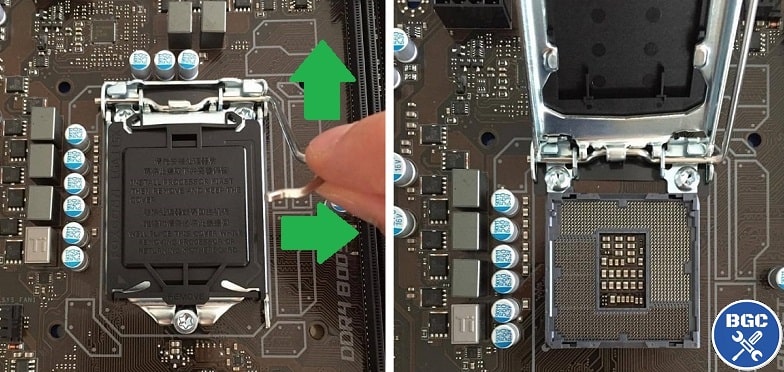 Opening an Intel CPU socket: Pull the retention arm out to the correct and then lift it upwards. Then open up the socket cover.
For installing AMD CPUs (AM4 socket) you as well have a picayune retention arm to lift out to the side so up, but there is no socket cover to open up. Instead, when you lift the retention arm upward to a 90 degree angle, it automatically opens up the middle of the socket to expose the middle.
Unlike Intel sockets, AMD sockets don't have covers. If yous're wondering, this is because Intel CPUs have the actual contact pins on the motherboard, whereas AMD CPUs have the contact pins on the CPU itself.
 Opening an AMD CPU socket: Lift the lever to xc degrees so that the middle of the socket slightly opens upwardly
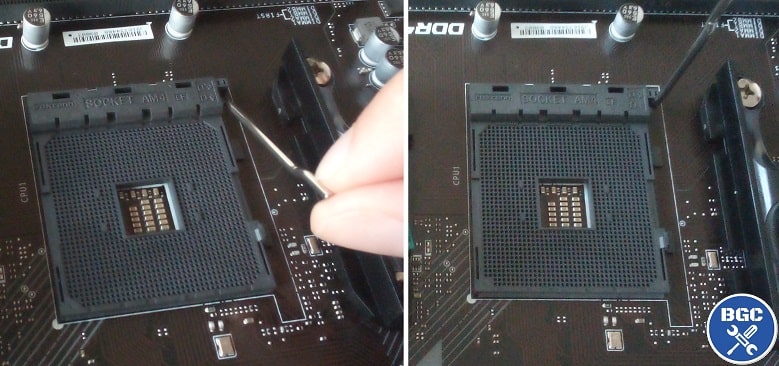
Pace three: Lucifer Arrow and Lower CPU Into Socket
Before picking up your CPU, first look closely at the CPU socket and wait for the minor marking/icon in the bottom left corner. This indicates which way to install your CPU, as there will exist an arrow on the CPU itself that goes in this corner:
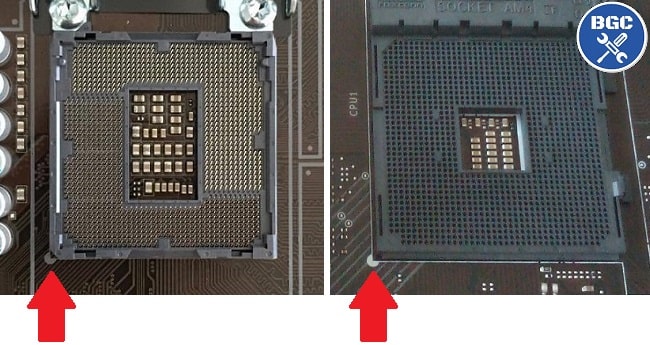 Both Intel (left) and AMD (right) sockets take a mark on the lesser left
Before grabbing your CPU, ground yourself by touching the metal part of your case or some other metal object (if yous're not using anti-static equipment like a wrist-strap or mat). It's besides worth mentioning again that you shouldn't ever touch the bottom of the CPU. Avoid touching the top of the CPU too, equally this is where the thermal paste of your CPU cooler volition exist and then you want the surface as clean as possible).
There's only one correct position to install an Intel or AMD CPU into the socket - by placing it then that the arrow on the CPU matches the mark on the bottom left of the socket (every bit pictured above). You don't want to accidentally lower in the CPU in the wrong way, every bit you risk dissentious/angle pins, so earlier lowering it in make certain you're enlightened of the arrow and which fashion to install it.
Be very careful not to drop the CPU, and slowly and carefully lower it into the socket as far as you tin can without letting go. When the CPU is fully lined up with the socket, y'all tin can very, very gently permit it become and it will naturally fall into place. Do Non forcefulness or button the CPU in - if you have lowered it in the correctly aligned fashion, it will effortlessly sit down into place. To confirm it'south fully installed, VERY gently try to nudge it a fraction to left or correct. If information technology wasn't already properly seated, it will gently fall into place when you do this.
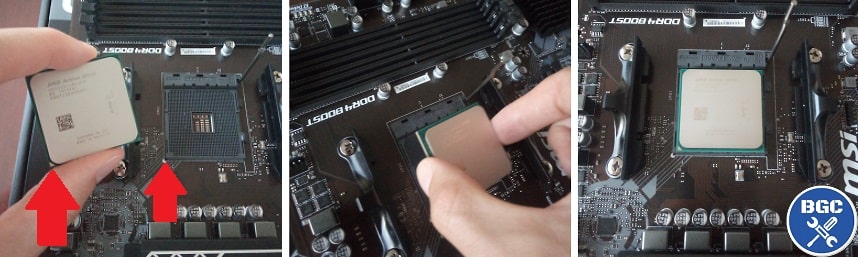 Friction match the arrow on the CPU with the mark on the socket, and very gently lower in the CPU
Step 4: Lock the CPU Socket
Now yous need to lock the CPU socket. For Intel CPU installs, lower the socket cover, so lower the retention arm (the small lever) and prune information technology dorsum into the hook. The CPU socket cover should then automatically come up off (store it in a box in case you demand it in future). For AMD CPU installs, to lock the socket you lot merely lower the retention arm downward and lock it into place.
That'due south your CPU installation done and dusted! Very uncomplicated to do, and hard to screw up if you but take your time and understanding each step in advance earlier actually doing information technology. At present that the brains of your new auto is in place, information technology's time to go along that little guy cool and serenity by fitting the heatsink and fan (CPU cooler).
Side by side: How to Install a CPU Cooler
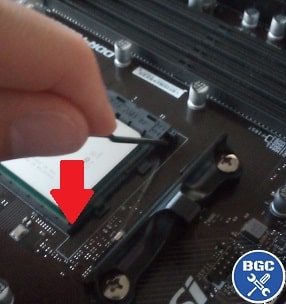 Pull the retention arm back into place
Search the Site
Trusted VPN
VPNs are fast becoming must-have software these days to ameliorate the security and privacy of your PC when online. There's lots of VPNs but NordVPN is objectively one of the best and the 1 I use. VPNs also help for online gaming equally explained here.
Near Me
Indie programmer currently working on my first game release (later on years of hobby projects), an atmospheric story-driven VR FPS/adventure built with Unreal Engine to exist announced once I'm ready hither and here (for anyone into VR FPS's). Also likes writing near tech, which helps to fund development of the game. My favs of all fourth dimension are OOT, Perfect Dark, MGS1, MGS2, GE007, DKC2, THPS3, HL1, WC3, Vice City, and KOTOR, with the most contempo addition to my list of immortals being the VR masterpiece Alyx.
If you want help with a new build or upgrade feel complimentary to enquire on the main PC builds guide. I try to respond to every comment. If you establish the site real helpful and want to help back up the work I do here, sharing an article with anyone y'all call up might also do good from information technology does help the site (I too take coffee if y'all feel I actually went higher up and across to help you personally). - Julz


Source: https://www.build-gaming-computers.com/how-to-install-cpu.html
Posted by: vinsonareimis.blogspot.com
0 Response to "How To Install Faster Processor"
Post a Comment